

While using a cloud server, It always very difficult to set up a domain or sub-domain in the digital ocean, Google Cloud and AWS. In given few steps I will explain to you how easily you can set up a sub-domain with your active domain in digital Ocean server.
Setup Sub – Domain in Digital Ocean:
-
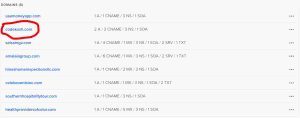
- Login to your digital ocean account.
- Click on the domain – e.g I want to make portfolio.codekosh.com – so I m click on codekosh.com from added domain list. As I have marked in reg.

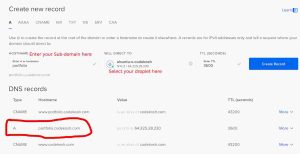
- Now you need to add the “A” record and CNAME record.
A record e.g: portfolio and CNMAE www.portfolio and point to your droplet.
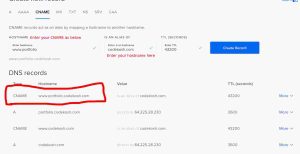
Create your CNAME record.
How To Set Up Apache Virtual Hosts on Ubuntu
Setting up Apache virtual hosts on Ubuntu allows you to host multiple websites on a single server, each with its own domain or subdomain. This setup is particularly useful for web developers, businesses, or individuals who want to run multiple websites through domain and subdomain on the same server without conflicts. Here’s a comprehensive guide to walk you through the process by codekosh.com.
Step 1: Install Apache
If Apache isn’t already installed on your Ubuntu server, you can install it using the following below commands.
sudo apt update
sudo apt install apache2
Step 2 — Creating the Directory Structure
Step to create a directory structure that will hold the site data that you will be serving to visitors.
Your document root, the top-level directory that Apache looks at to find content to serve, will be set to individual directories under the /var/www directory. You will create a directory here for each of the virtual hosts.
Create a directory structure to store the website files for each virtual host. Within each of these directories, you will create a public_html directory. The public_html directory contains the content that will be served to your visitors.
Use this command, with your own domain name, to create your directories.
sudo mkdir -p /var/www/example.com/public_html
Replace example.com with your domain name.
Step 3: Assign Permissions
You’ve created the directory structure for your files, but they are owned by the root user. If you want your regular user to be able to modify files in these web directories, you can change the ownership with this command.
sudo chown -R $USER:$USER /var/www/example.com/public_html
The $USER> variable will take the value of the user you are currently logged in as when you press ENTER in terminal. By doing this, the regular user now owns the public_html subdirectories where you will be storing your content.
You should also modify your permissions to ensure that read access is permitted to the general web directory and all of the files and folders it contains so that the pages can be served correctly.
sudo chmod -R 755 /var/www
Your web server now has the permissions it needs to serve content, and your user should be able to create content within the necessary folders. The next step is to create content for your virtual host sites.
Step 4: Create Sample HTML File for host (Optional)
With your directory structure in place, you can start focusing on individual virtual host site and the content within that site. Start by creating an index.html page for your subdomain e.g portfolio.codekosh.com.
Run this command to open and create the index.html. This example uses nano:
nano /var/www/subdomain.example.com/public_html/index.html
You can add some html stuff in your index.html file to load the file in broswer by your subdomain.
To save and close the index.html file in nano, start by pressing CTRL+X. Press Y when prompted to save the file, then press ENTER when you are finished to exit.
Step 5: Creating New Virtual Host File
Apache on Ubuntu uses separate configuration files for each virtual host. You can create a new configuration file for each site in the /etc/apache2/sites-available/ directory.
sudo nano /etc/apache2/sites-available/subdomain.example.com.conf
Enter the following configuration in the config file:
	    ServerAdmin admin@example.com
	    ServerName example.com
	    ServerAlias www.yoursubdomain.example.com
	    DocumentRoot /var/www/yoursubdomain.example.com/public_html
	    ErrorLog ${APACHE_LOG_DIR}/error.log
	    CustomLog ${APACHE_LOG_DIR}/access.log combined
Save and close the file.
Step 6: Enable the Virtual Host file
In previous step that we have created the virtual host file, you must enable them. Apache includes some tools that allow you to do this.
You’ll be using the a2ensite tool to enable each of your sites.
sudo a2ensite subdomain.example.com.conf
Before reloading your server, you have to disable the default site defined in 000-default.conf by using the a2dissite command.
sudo a2dissite 000-default.conf
Next, command to test the configuration errors:
sudo apache2ctl configtest
When you are finished the above process, restart Apache to make these changes take effect.
sudo systemctl restart apache2
Optionally, you can check the status of the server after all these changes with this below command.
sudo systemctl status apache2
That’s it! You should now be able to access your website using the subdomain name you configured. Repeat steps 2-6 for each additional virtual host you want to set up.